Showing posts with label decorations. Show all posts

4.21.2010

Reception Details

I got a little ahead of myself and forgot to blog about all the reception details. I can't describe how amazing it was to see all of my hard work come together in one room. I had trouble focusing on Brandon during our first dance instead of looking around the ball room.

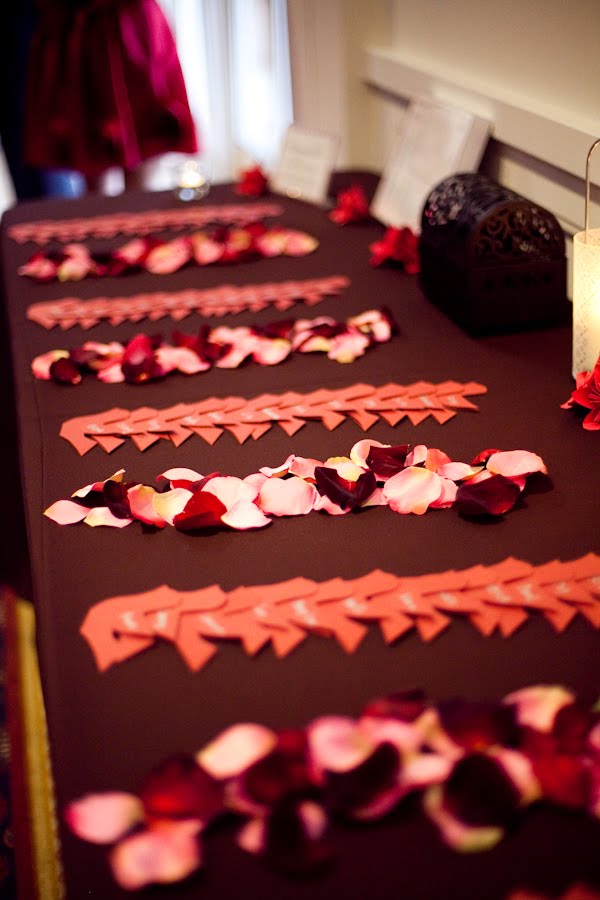
Guests were asked to find their little bird escort cards in order to find their seats.

The table was decorated with extra bird houses, kusudama paper flowers, candles and a large framed picture of us from our engagement session with Daniel Yu.


The birds were placed in alphabetical order and separated by rose petals.

Instead of a guest book, we asked everyone to leave us their wishes on separate cards.

Cards were then placed in a glass apothecary jar. We got some great wishes, some sweet and some funny. I wanted to post some on here, but I had completely forgotten to scan them before I pasted them into my scrapbooks.

Crossword puzzles were available to distract guests with before the reception began. However, I think most guests decided to munch on the yummy bread instead.

Cards were collected in a bird cage.

Our centerpieces were absolutely gorgeous in the East Room, which explains why I have so many pictures of them on this post.

Here is a picture of our table numbers at work.

Place cards were printed on extra stationary leftover from the invitations.

Menus were placed on each table setting.

Candles hung from the manzanita tree branches.

The gorgeous chandeliers really completed the classy atmosphere of our reception room.

Yup! Gorgeous. (Picture taken by Bridesman Tony)
Photography by Hannah Suh unless otherwise noted.

2.10.2010

Ceremony Details

If I would think that you would enjoy it, I would do a single post completely dedicated to my tissue pomander balls, but I don't know how many of you would appreciate that. Instead, here is a picture-heavy post on the details of our wedding ceremony.


Here is the entire set-up for the ceremony. (Taken by Linda Ko)

I found these paper lanterns at Target, 2 for $2.50 (Taken by Linda Ko)
Remember how I saved almost $300 by making our own bouquets? Here are the final results. The girls had their initials sewed on so that they could identify their own bouquets.

My bouquet had a little silver locket engraved with the letter "M" that Brandon gave me. Inside was a picture of my grandfather. Two charms house the pictures of Brandon's grandpa and his stepfather, Albert.


We had programs and bubbles for our guests to grab, but over half of them were left untouched. At least it made a pretty picture!

Brandon helped me make these programs. Total cost was about $15. $13 for the stupid stapler that we had to buy and $2 for the paper. Pomander balls! The hours and hours spent on these beauties were absolutely worth it in the end. They really made such a difference

Thanks to Tiff S. for fluffing them the night before the wedding!

Instead of purchasing a separate arch, we took two of our centerpieces and placed them on tall brown boxes at zero cost!
Ah, so gorgeous.
Pictures by Hannah Suh unless otherwise noted.

10.20.2009

Another Completely Unnecessary Detail

Edit: View final results here

(I craft when I'm stressed.)

When I was researching wedding cupcakes I came across numerous adorable flag toppers. They were too cute and cheap to resist making on my own.
Step 1: Format your flags on the computer and print. I found that PowerPoint was the easiest program to use. Include cutting guidelines in a light gray color.
Step 2: Cut and fold
Step 3: Glue halves together. Use the toothpick to spread the glue around so that it's nice and smooth. This also makes sure that the flag sticks onto the toothpick.
Step 4: If desired, make snips on the ends.
And voila! You have little flags to decorate your cupcakes...as if cupcakes on their own aren't already cute enough.

I'm going to have the caterers stick them in the cupcakes when they're served to the guests.

10.16.2009

Done Before 10am

A $12 glass apothecary jar from Marshall's + some brown ribbon + a little tag + pink crepe paper roses Add a sign with directions inside a 50 cent frame from Big Lots
Plus a basket filled with red wish cards and pens

Equals a wish jar station for our guests


Here is our bird cage from Target which will be used to hold cards from guests. I had better pictures of it, but I decided that it was time for Bella to make another appearance.

Next projects: wedding bubble tags, cupcake flags, cupcake tree/stands

9.04.2009

Oh Happy Day!


Why am I so ecstatic? Because after 30+ hours of cutting, folding, twisting, fluffing, and sticking, I am finally done with making my twelve tissue pomander balls. When I say 30 hours, I do mean 30 hours. Future brides, pick a red color scheme so that these babies can be used again after their 30 minutes of glory during the ceremony.

Final cost breakdown after a few adjustments: 2 packs of six 3" styrofoam balls ($5.99), wire ($1.75), ribbon ($0.69), 120 sheets of tissue paper (about $11)= a total of $19.43. Not shabby considering that a pack of five red lanterns on clearance at Target is $14.99.

I also made a sign for our candy buffet table that is going to be provided by our caterer. Since I have no idea what the candy buffet will look like or even what candies they are providing, I wanted to at least create a cute sign. I was inspired by this sign and customized it to fit our own weddding:

I will also be making more stickers similar to the ones that were sent out with our STD to customize the cellophane bags that guests will be able to fill with their sweet treats.

I wish my camera took better pictures because this stuff looks better in person.

8.31.2009

A Time Consuming Alternative

The Nixon Library's garden is already beautiful enough without any extra decorations. Even so, I wanted to have something line the aisles to make it pop.

Our original plan was to use paper lanterns, but I could not find any that were the right size or color.

I now thoroughly regret not looking harder because I stupidly took on a new task: tissue pomander balls.

The blogger who maintains Vintage Glam has a wonderful tutorial to how she created her ceremony decorations. Her gorgeous yellow pomander balls look absolutely amazing in the pictures to the left.

After seeing these photos I decided that I needed them. Again, stupid.

The materials for this project are inexpensive:
Tissue paper: $1.79 for a pack of 20 sheets, which makes 40 flowers
4" Styrofoam ball: $1.74 after 50% off coupon
Wire: $1.75
Ribbon: $0.69 on clearance

I followed the tutorial pretty closely, but had to adjust a few things.

In order to attach the ribbon, I first tied off the ends of the ribbon into a knot. Next, I twisted a piece of wire around the knot.
Instead of using a 5" ball, I used a 4" ball. I had first attempted it with the larger size, but the result was a massive pomander. My final pomander is still bigger than I want, but I refuse to take another one apart and try again.
I attached about 30 paper flowers instead of the estimated 20 in the tutorial, which will mean that I need to fold even more flowers. This is not a task I am happy about since it took me more than 12 hours to cut, fold, and fluff 160 tissue flowers.
Here is my final result. The first picture is so that you can compare the size of the styrofoam ball to the full pomander. Can you see why I would underestimate the amount of flowers needed and the size of the pomander?
Bella decided that she wasn't getting enough attention so she barged into the picture. I'm going to try to make it a little fuller and I think it will look better.
All this work better be worth it!

8.11.2009

A Typical Night

What does a soon-to-be bride do on a free night? She works on all the little details for the wedding, of course!

I wanted to try to incorporate pictures of Bella for our table numbers like the one pictured to the left (Source), but Groomzilla vetoed that one. Plus, our dog is not the most photogenic of mammals. She mostly looks like a crazed Bellatron.

I wanted something creative that would fit along with our love birds theme. I decided to use little wooden birdhouses I found at Joann's for $1 each for our table numbers (with Groomzilla's approval), and little birdies for escort cards.

I have not painted the numbers on the side of the roofs yet, but I think they will turn out good. Although they are definitely flawed and took hours to finish, they will serve their purpose.


I am staying with Brandon in Columbus, Georgia for a week starting Saturday. While he is at work, I will be sitting at the house alone with no one but his new dog (yes, he's cheating on Bella) for hours.

To fill my time, I will be working on several projects. Hopefully I don't make a mess because that is what tends to happen whenever I work on anything.

I will work on thank you cards, escort cards, menus, programs and tissue pomander balls.